Table of Contents
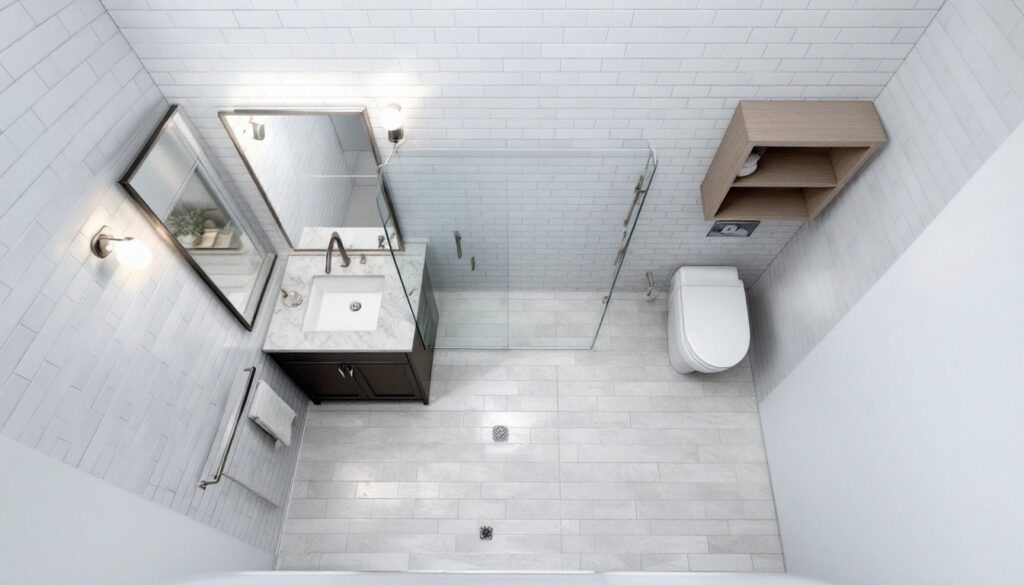
ToggleA 6×6 bathroom is a tight footprint, 36 square feet that needs to handle washing, toileting, and storage without feeling like a closet. Many homeowners see this as a constraint, but it’s actually an opportunity to design a highly functional space with zero wasted real estate. Smart bathroom layout planning means every fixture and surface earns its place. Whether you’re renovating from scratch or refreshing an existing compact bath, understanding the three most practical configurations and the storage and lighting tricks that make them work will set you up for a space that’s both usable and pleasant to be in.
Key Takeaways
- A 6×6 bathroom layout should prioritize one of three proven configurations—single-fixture wall, galley-style, or corner-focused—based on your door placement and usage patterns to maximize functionality and flow.
- Smart 6×6 bathroom design requires vertical storage solutions like wall-mounted shelving and recessed medicine cabinets rather than relying solely on vanity cabinets to avoid wasted space.
- Proper three-point lighting (ceiling fixture plus flanking sconces) combined with light-colored walls and large-format tile prevents small bathrooms from feeling cramped and enhances usability.
- Invest in either a pocket or sliding barn door for shower enclosures in tight spaces to minimize swing interference and keep water contained without sacrificing accessibility.
- Strategic mirror placement—preferably full-height or wall-to-wall above the vanity—amplifies perceived depth and reflects light to make your 6×6 bathroom feel significantly more spacious.
- An exhaust fan rated 50–80 CFM run for 20–30 minutes after showers is essential to prevent moisture damage and mold in compact bathrooms regardless of your chosen layout.
Understanding Your 6×6 Bathroom Footprint
Before you pick a layout, measure your actual dimensions and note any fixed points: the door swing, windows, and plumbing rough-ins. A true 6×6 gives you 36 linear feet of wall space to work with, but the door and any windows reduce usable wall length.
Start by drawing a rough floor plan on graph paper or using a free online tool. Mark the door opening, its swing direction, and any existing windows or vents. This single step prevents layout disasters like a swing-out vanity cabinet that blocks the door. Also check your ceiling height and note any ceiling obstructions (exhaust ducts, pipes): these affect fixture placement and mirror/lighting options.
Do not assume existing plumbing is optimal. Moving a toilet, sink, or shower drain adds cost and may require a permit, but if the current layout forces you to squeeze past fixtures, relocating roughing-in is worth the investment. Codes vary by jurisdiction, so confirm with your local building department what size drains and vents are required for your space.
The Single-Fixture Wall Layout
The most straightforward 6×6 setup lines the toilet, sink, and shower along one wall. This leaves the opposite wall open and creates a walkway between them. It’s ideal if your door is on one of the short walls.
Place the toilet at one end (often near the door corner), the sink in the middle, and the shower enclosure or tub at the far end. A 36-inch-wide vanity with an undermount or pedestal sink works well: pedestal sinks save visual space in tight quarters, while undermount vanities maximize storage. The shower can be a 32-inch corner enclosure (the minimum practical width) or a 60-inch tub-shower combo if you need both bathing options.
This layout’s biggest advantage is clear sightlines and easy movement. The downside: one person showering blocks access to the toilet. If two people share the bathroom, this gets awkward fast. Install a 60-inch-wide sliding barn door or pocket door on the shower enclosure, it takes less swing space than an outward-swinging door and keeps water contained.
Mirror and lighting placement matters here. Hang the mirror above the sink (typically 12 to 18 inches above the counter) and flank it with wall sconces or a horizontal light bar. This prevents shadows and keeps the vanity usable while someone showers.
The Galley-Style Configuration
Galley layouts place fixtures on opposite walls, creating a corridor effect. In a 6×6, you might put the toilet and sink on one side and the shower on the other, with the doorway at one end of the galley.
This configuration maximizes wall space and works better for shared bathrooms because the toilet and sink remain accessible while someone showers. Use a compact, wall-mounted toilet (saves floor area) and pair it with a 24-inch or 30-inch-deep vanity if space is truly tight: standard vanities are 21 inches deep and offer more storage, but the extra depth eats into floor clearance.
The shower enclosure sits opposite, again keeping it 32 to 36 inches wide to preserve the walkway. A small space living solution is to use a frameless glass enclosure instead of a framed one, the glass doesn’t visually clutter the space and makes the bathroom feel less cramped.
One catch: galley layouts can feel narrow if ceiling height is standard (8 feet). Tall, vertical mirrors and light-colored tile on both walls help counteract this. Avoid dark tile in the corner angles: it shrinks the perceived space.
The Corner-Focused Arrangement
The third proven configuration clusters fixtures in one corner to open up the rest of the footprint. Tuck the toilet and sink together (often as an L-shaped vanity unit) in one corner, and place the shower in an opposite or adjacent corner. This leaves the most open floor space and creates a buffer zone near the door.
Corner vanities with two small sinks or a single 36-inch corner basin can be tricky to source, but they exist and work beautifully in tight layouts. Pair it with a wall-mounted toilet for extra legroom. A corner shower enclosure (sometimes called a corner neo-angle) typically runs 32 to 36 inches on each side and fits snugly into the corner.
Visually, this layout feels the most spacious because the eye travels across open floor. The trade-off is that corner vanities and enclosures have higher price tags and require precise plumbing alignment. Also, corner fixtures are harder to clean behind: expect dust and moisture buildup unless you commit to regular ventilation and wiping.
If a corner layout appeals to you but budget is tight, use a standard rectangular vanity positioned in a corner and add a small corner shelf unit above it for extra storage. Pair this with a standard rectangular shower enclosure on an adjacent wall.
Storage and Organization Solutions
Storage failure tanks small bathrooms. With only 36 square feet, every inch wasted is noticeable. Beyond a vanity cabinet, plan vertical storage from day one.
Wall-mounted shelving above the toilet adds 12 to 24 cubic feet of storage without eating floor space. Install open shelves (lighter aesthetic, requires tidiness) or closed cabinetry (hides clutter, adds visual weight). Use recessed medicine cabinets instead of surface-mounted ones: they tuck into the stud cavity and take zero floor or wall clearance.
Under-sink organization dividers, pull-out drawers, and door-mounted racks maximize cabinet efficiency. A sliding or pop-up trash bin under the sink saves corner space. If plumbing allows, a drawer unit under the sink (in place of open pipes) adds surprising storage for linens or cleaning supplies.
Don’t overlook the back of the door, install a over-the-door rack for towels, robes, or spray bottles. Just ensure it doesn’t interfere with the shower enclosure door if the bathroom opens near the shower. Consider design and layout inspiration to see how others have tackled compact bathroom storage creatively.
Design Tips for Visual Space and Light
A small bathroom feels larger with the right light and color. Proper lighting is non-negotiable: underlit small bathrooms feel cramped and dated.
Install a central ceiling light (flush or semi-flush mount to avoid low sag) plus sconces flanking the mirror. This three-point lighting approach eliminates shadows and makes the vanity functional while showering. Use LED bulbs rated 3000K to 4100K (warm to neutral white) to avoid a clinical look. Code requires a 20-amp GFCI-protected circuit for all bathroom outlets and lights: confirm your existing wiring meets this standard.
Color and material choices compound the spacious feeling. Light-colored walls and tile (white, soft gray, pale blue) bounce light and feel open. A single dark accent wall or feature tile works, but avoid pairing it with dark flooring, that closes in the space visually. Large-format tiles (12×24 inches or larger) create fewer grout lines and read as more expansive than small mosaic tiles.
Mirrors are the secret weapon. A full-height or near-full-height mirror above the vanity (or even a wall-to-wall mirror) reflects light and doubles the perceived depth. Avoid tiny decorative mirrors in favor of generous, functional reflective surfaces. Interior design inspiration and home decorating galleries show how professional designers use mirrors to amplify perceived space in compact baths.
Ventilation affects aesthetics too. An exhaust fan rated for your bathroom square footage (typically 50-80 CFM for a 6×6) prevents moisture damage and mold. Run it during and 20 to 30 minutes after showers. A damper prevents drafts and heat loss in winter.
Conclusion
A 6×6 bathroom doesn’t have to feel claustrophobic. Choose one of the three core layouts, single-fixture wall, galley, or corner-focused, based on your traffic patterns and fixture needs. Prioritize storage, lighting, and color to maximize visual space, and don’t cut corners on ventilation. With intentional planning and appropriate finishes, your compact bath will be as functional and pleasant as larger ones.