Table of Contents
ToggleIf you’re renovating a bathroom for aging parents, a family member with mobility challenges, or planning ahead for your own future, an ADA-compliant vanity isn’t just a nice-to-have, it’s a practical investment in accessibility and safety. Unlike a standard bathroom vanity, an ADA-compliant model meets specific height, clearance, and knee space requirements that make the sink usable for people in wheelchairs, those with limited mobility, or anyone who benefits from thoughtful ergonomic design. Building these standards into your bathroom project now avoids costly retrofits later. This guide walks you through what makes a vanity ADA-compliant, which standards matter most, and how to choose and install one that works for your space and budget.
Key Takeaways
- An ADA-compliant bathroom vanity must meet specific height (34 inches maximum), knee clearance (27 inches), and toe space (9 inches minimum) requirements that make sinks accessible for wheelchair users and people with mobility challenges.
- Wall-mounted vanities are the safest choice for ADA compliance because they inherently provide the required knee clearance without intrusive cabinet bases or pedestal supports.
- Lever handles or sensor-activated faucets are essential for ADA-compliant vanities, as they don’t require gripping or twisting and accommodate users with arthritis or reduced grip strength.
- Proper plumbing installation must route supply lines and drains outside the knee space, insulate exposed pipes, and use flexible hoses to prevent burns and maintain accessibility underneath the sink.
- Budget-friendly ADA-compliant vanities start around $400–$800 for basic wall-mounted models, while quality materials like solid wood or quartz countertops range from $1,200–$2,000, so verify specifications rather than assume higher prices guarantee better accessibility.
- Installing an ADA-compliant bathroom vanity requires measuring bathroom layout carefully, securing wall mounts to studs, and verifying clearance measurements after installation to ensure the vanity meets accessibility standards.
What Makes a Bathroom Vanity ADA-Compliant
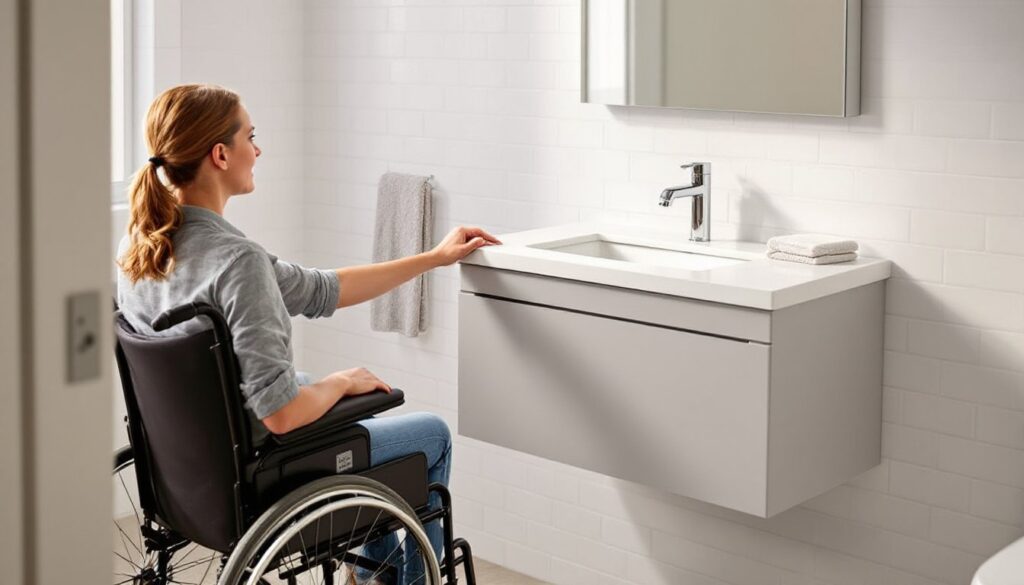
An ADA-compliant vanity isn’t a special category of furniture, it’s a standard sink cabinet that meets clearance and height specifications outlined in the Americans with Disabilities Act Accessibility Guidelines (ADAAG). The key difference from a typical vanity is the absence of (or easy removal of) the cabinet base, creating open knee and toe space underneath the sink. This open design allows someone in a wheelchair to roll underneath and reach the faucet, mirror, and soap dispenser comfortably.
The vanity must also be installed at the correct height so the sink rim sits within the reach range of most users. A standard vanity top is usually 30 to 32 inches high: ADA specs call for 34 inches maximum. That extra 2 to 4 inches might seem minor, but it accommodates a wider range of body types and seated users. The sink basin itself should be no deeper than 6.5 inches, shallow enough that someone seated doesn’t have to lean far forward.
Another requirement is the faucet type. ADA-compliant sinks typically use lever handles or sensor-activated faucets rather than knobs, since these don’t require gripping or twisting. This detail matters more than many homeowners realize: a beautiful vanity with a stubborn knob defeats the whole purpose.
Key ADA Accessibility Standards for Vanities
Knowing the specific measurements and rules behind ADA compliance helps you make informed decisions when shopping or retrofitting your bathroom.
Height and Clearance Requirements
The rim of the sink must be installed at a maximum height of 34 inches from the finished floor, with 29 inches minimum. This range accommodates most wheelchair users and seated individuals. The counter surface should be no higher than 34 inches, and ideally 32 inches for maximum flexibility.
Clearance in front of the vanity is equally important. The ADA requires a minimum of 30 inches of clear floor space directly in front of the sink, measured from the cabinet edge. In reality, many designers recommend 48 inches if the bathroom layout allows, to give wheelchair users enough room to approach and maneuver comfortably. This space must be kept clear of clutter, bath mats, or storage bins.
The mounting of pipes and supply lines also matters. Any exposed pipes under the sink must be insulated or shielded so they don’t burn someone’s legs or feet during transfer or extended use. Flex hoses are preferable to rigid copper for easier repositioning, and PEX tubing with sleeves works well.
Knee and Toe Space Specifications
Open knee space under the vanity is the hallmark of ADA compliance. The cabinet base must either be removed entirely or designed as a hanging (wall-mounted) vanity that allows at least 27 inches of clearance from the floor to the underside of the countertop. Toe space, the area directly beneath where someone’s feet would go if seated, should measure at least 9 inches deep and extend the full width of the sink.
The underside of the countertop should have no obstructions hanging down into this space. Vanities with backsplashes are fine, but they shouldn’t extend below the counter surface into the knee area. Some homeowners make the mistake of adding decorative toe-kick boards or shelving that eat into the required clearance, avoid this. The empty space isn’t wasted: it’s essential access.
Choosing the Right ADA-Compliant Vanity for Your Bathroom
When shopping, you’ll find that most vanity manufacturers now offer ADA-ready models, but not all are created equal. Some are purpose-built with accessible features: others simply omit the base. Comparing options means looking at sink depth, faucet placement, counter material durability, and whether the vanity is wall-mounted or pedestal-style.
Wall-mounted vanities are the safest choice for ADA compliance because they inherently provide the required knee clearance. Pedestal sinks, while space-efficient, can be tricky: the pedestal base often eats into the required toe space, so measure carefully before committing. If you want a more traditional look with storage, choose a vanity with a removable base or one designed with open shelving underneath instead of a solid cabinet.
Sink material affects accessibility too. Porcelain and vitreous china are durable and easy to clean, good for high-traffic or caregiving situations. Vessel sinks mounted on top of the counter are less ideal for ADA use because they raise the rim height further: under-mount or integrated bowls are better. Quality faucets with lever handles cost a bit more upfront but last longer and function better for users with arthritis or reduced grip strength.
Budget-wise, ADA-compliant vanities range from $400 to $2,000+ depending on size, material, and storage. A basic wall-mounted vanity with laminate or veneer runs $400–$800: solid wood or quartz countertops push into the $1,200–$2,000 range. Don’t assume a higher price guarantees better accessibility, check the specifications. Research options on bathroom vanity reviews and guides and home design inspiration sites to compare styles and verify which models meet ADAAG standards.
Installation Tips and Best Practices
Installing an ADA-compliant vanity requires attention to detail, but it’s manageable for a confident DIYer with plumbing basics. Here’s what matters most.
Measurement and Layout: Before ordering, measure your bathroom carefully, wall-to-wall, floor to any obstacles, and the location of existing plumbing rough-ins. Mark the centerline of where the sink will sit. The finished floor elevation also matters: if your bathroom has a step up or down, account for that when setting the 34-inch rim height. Use a level and a tape measure to mark the exact mounting height on the wall before drilling.
Wall Support: Wall-mounted vanities hang on studs or blocking, so locate studs with a stud finder and plan to mount the vanity on at least two studs or use appropriate anchors if studs don’t align perfectly. This is non-negotiable, a vanity supporting a sink full of water and a person’s weight needs solid support. If your walls are plaster or older drywall, consider installing a 3/4-inch plywood backing strip between studs at the correct height for extra security.
Plumbing Connections: Supply lines and drain pipes must be routed so they don’t intrude into the required knee space. Angle flexible supply hoses to the side and secure them with clamps. The drain trap should be positioned to one side, not centered under the sink. Insulate hot water lines with foam sleeves, this is required by code in many jurisdictions and is essential for safety.
Faucet Installation: Install the faucet before or after the vanity is mounted, depending on your model. Ensure lever handles extend from the faucet body and can be operated with a closed fist (no fine motor control required). Test the water temperature and pressure: many building codes now recommend thermostatic mixing valves to prevent scalding, which is especially important if the user has reduced sensation.
Floor Clearance: After installation, verify you have the required 27 inches of clear knee space and at least 9 inches of toe space. Use a straightedge under the counter to check for drips. Ensure any caulk or sealant around the base doesn’t restrict access. Some advanced construction guidance on universal design can help fine-tune these details.
Permits and Inspections: If you’re modifying a bathroom for accessibility as part of a wider renovation, check with your local building department about permit requirements. Some jurisdictions require permits for plumbing work or structural changes: others require inspection of grab bars or blocking installed for future grab bar support. An ounce of paperwork upfront beats a failed inspection later.
Conclusion
An ADA-compliant bathroom vanity is a smart, forward-thinking upgrade that benefits users of all ages and abilities. By understanding the key standards, sink height, knee clearance, faucet type, and drainage layout, you can choose and install a vanity that’s both functional and stylish. Whether you’re preparing your home for an aging family member or simply building in accessibility from the start, this investment pays dividends in safety, usability, and long-term home value.